Showing posts with label elfcosmetics. Show all posts

Wednesday, December 2, 2015

Everyday Natural Brow!

Brows shape and frame your face. Some people are blessed with thick beautiful brows, others were given tweezers in the 8th grade and no longer have much brow to work with. If that is you, don't give up, you too can give the illusion to beautiful brows! I have naturally thick brows, but on my left eye I have two scars that I like to fill in without making my eyebrow look too harsh. Here's my tutorial on how I do my everyday natural brow.

For this look I am using Anastasia Beverly Hills Brow Wiz in the shade Ebony, Maybelline Master Conceal in Fair, a shader brush, small angled liner brush, and a brow brush.
To begin I brush my brows into the position I want them. I like to make sure all the hairs are going with the shape of my brow. The Brow Wiz is double sided- on side is the product and the other is a spooly. To brush my brows I either use the spooly that comes with my Brow Wiz, or I will use a brow brush. 
  Next, with my brow pencil, I line the bottom of my brow using short strokes and applying light pressure.  I do this starting at the beginning of the brow (use your nostril as a guide to the start of your brow) until the tail of the brow. Your arch should be inline with the pupil of your eye.
Then, I focus on the tail of my brow and the scar in my brow. I like the tail end to be darker than the beginning for a more natural look. I fill in everything except the front of my brow. I use short strokes to achieve a natural hair like look.Then, I blend the color with my spooly to disperse some of the product evenly.
  The next step is optional, you don't have to do it. I like to take my concealer on a small angled liner brush and line under my brow, I also conceal the top of my brow from the arch to the tail. This will give the brow a clean and highlighted look. After, I blend in the concealer with a shader brush to get rid of any harsh lines.
Here is my finished look! I hope you enjoyed this natural eye brow tutorial! If you try this look out, post a picture on IG with the hashtag #beautyinsiderbyna so I can see your take on this tutorial. 

If you have any questions/ business inquires please email me @ beautyinsiderbyna@gmail.com 

xoxo
-Feliciana

Saturday, November 21, 2015

Thanksgiving Eye Look!

For the love of Thanksgiving, what're the two things women love most. Food and glamour, duh! I have created a look that I think is perfect for Thanksgiving dinner once again using my BH Cosmetics Fifth Edition Eyeshadow Palette. A chocolate crease, with a copper lid, winged out shadow and liner, and to top it off Grand Glamour lashes by Vegas Nay!


I always like to start my looks off with a base, for that I use my Maybelline Master Conceal in the shade 10 Fair. By putting a base I am ensuring the longevity of my look.


My second, most important step is to always, always, always use a transition shade. Transition shade are important because it makes blending darker shades a breeze. For my transition shade I used a light brown shadow with a small tapered blending brush. Using windsheild wiper motions, I put my transition shade into my upper crease focusing on the crease bone.


Next, using a darker brown shadow in my lower crease (right under the previous transition shade), I created a cat eye shape by slightly winging out the shadow with a large fluffy brush. This will help elongate the eyes for a subtle dramatic look. I also packed on a cream shimmer shadow with a shader brush. 


For more definition to my look, I added a beautiful copper foil eye shadow to my outer corner with a shader brush. By using a darker shade in the outer corner, I am creating dimension to this look.


Once you're finished with the lid, its time to work on the lower lash line. I smoked out the lash line with a mall shader brush and the same dark eye shadow I used on the lower crease.


Now for my favorite part, WINGED LINER. This will also help to elongate the eye also. I am using my favorite E.L.F. Cream Liner with a small angled brush.


I love to finish off a glam look with my Vegas Nay Grand Glamour lashes. These are reusable, great quality lashes at an affordable price! I bought mine at Target in the beauty section.


That's the completed look! I hope you enjoyed it. Please leave any questions or comments down below. Follow my blog for Beauty Insider everyday!

Friday, November 20, 2015

Tweezerman Tweezers Review

While out fixing my cracked screen at the mall, I couldn't help but notice Sephora in perfect walking distance from the kiosk. So, I drug my boyfriend to Sephora, and after a good fifteen minute stroll in Sepora I finally picked up a new pair of Tweezerman tweezers! The tweezers I got were awarded by Allure Magazine, so I knew they had to be good! 

I knew once I got home I had to review this bad boy. (I like to pluck my brows in between eyebrow threading sessions- it's been a while if you can't tell!) I've always been a fan of Tweezerman, and once I lost my other pair of tweezers I was devastated, so I could only hope these lived up to my standards. 

Let me tell ya, they did! I was able to get every stray hair, even those short, to get hairs! If you're a plucker like me, Tweezerman is they way to go. They are sharp with a nice slant that makes it easy to grasp the hairs. Check out my before and afters! 


Let me know in the comments if you've ever used Tweezerman tweezers! Follow my blog for more Beauty Insider! 

5 Ways to Exfoliate

Want clean, glowing, refreshed skin? EXFOLIATE! Exfoliating gives you a smooth canvas for lotions and potions to effortlessly absorb into your face or body. After exfoliating, you're left with smooth, plump skin. Here are my favorite ways to exfoliate! 


Facial Exfoliation 

1. Silicone Facial Brush 
You can find these at Walmart in the Beauty section, or on Amazon. I use my scrubber every day. I love it for mild exfoliation. Not only does it remove the dead skin cells, it also helps to remove all the makeup built up in your pores.


2. St Ives Blemish Control Scrub 
If you have acne prone skin, this is a great option for you! Salicylic acid is a key ingredient in this scrub. It's also a key ingredient in many acne fighting remedies. With this scrub, a little goes a long way, I use a quarter size amount for my whole face. Rub the scrub in circular motions, going in an upwards direction, this way you're fighting gravity and won't cause premature aging! 


3.  DIY Coconut Oil Exfoliating Scrub
For this scrub you will need coconut oil and pure cane sugar. Its super simple to make, I have talked about my love for this scrub in my Beauty Tip Tuesday post. Organic unrefined coconut oil is best to use for this scrub. If you are making this scrub for facial use: in a small container, mix one tablespoon of coconut oil and two teaspoons of pure can sugar. Apply gently in circular motions, in a upward direction. I promise you, your skin will feel better than ever before. 


Body Exfoliation 
  
4. Exfoliation Loofah Pads
Not only is the DIY Coconut Oil Scrub good for your face, its also great for your body! (Put a few drops of your favorite essential oil, I like lavender oil.) I like to use my DIY scrub with a loofah pad for ultimate exfoliation.  Be sure to change out your loofah every two weeks to avoid unwanted bacteria. 


5. Shaving 
Believe it or not, shaving is a great way to exfoliate your legs and arms. When you shave not only are you removing body hair, you're also taking a layer of dead skin off. That's why your legs are touch-ably soft when you are done shaving! 


Tips:
  • Be sure to always use a moisturizer after any type of exfoliation treatment to prevent dry skin. 
  • Don't over do it. Exfoliating is great, but there is such thing as too much. Once or twice a week is enough to give you clean, soft skin.


All questions are comments are appreciated! Follow my blog for Beauty Insider every day!

Thursday, November 19, 2015

Plum Eye Look

Purples and plum eye shadows are perfect for brown eyes! I have broken down my favorite eye look into easy to follow steps. For this look I used the Fifth Edition 120 Color Eye Shadow Palette by BH Cosmetics, but this look can be used with any plum shades you like, or change out the colors to fit your look for the day.

First, I started off with a clean eye and applied a base. For my base I am using Master Conceal by Maybelline in the shade 10 Fair. I like to use this as a base because it helps my eye shadow stay all day. After I applied the concealer, I set it with a skin tone powder.


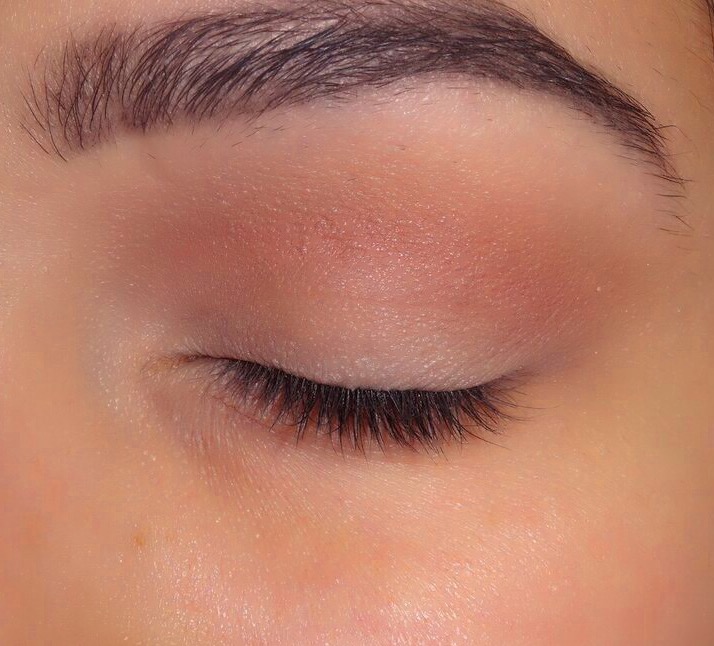
Next, I applied a tan eye shadow from my Fifth Edition Palette. I used a large fluffy blending brush for this step. The key is to blend until you have flawless transition and no harsh lines. It won't look like much now, but adding a transiton shade to the top of the crease bone will make blending all other shadows so much easier.


I applied a second brick tone shade into my crease. I used a smaller blending brush for more precision. Again, blend until you can blend any more! By adding a brick tone, red-brown shade I am creading dimension in the crease. 


After my transition shades were blended together, I took the darkest plum shade on my palette and applied it to the outer corner until I covered about 1/3 of my eye. Be sure to pack this color on using a patting motion to get the most pigmentation and color pay off. With the same brush (shader brush) I also applied a small amount of black to deepen the look. By the end of the tutorial, you will see that I have added more dark plum and black to make the color POP!


Next comes the middle and inner corner, for this step I used a different shader brush. I applied a lighter plum color and a cranberry color to the middle lid. For the outer corner I applied a metallic plum shade. I made sure to pack these colors on as well.  


Next comes the winged liner. This step is optional! If you're not comfortable with a wing, you can simply have a thin line of eyeliner, or you can skip this step all together! I used my favorite cream eyeliner by E.L.F. with a small angled brush. Since this liner is smudge proof you can even apply it to your water line with your angled brush for an even more dramatic look.


Another optional step, but one of my favorites, FALSIES! I am wearing falsies by Vegas Nay in the style Grand Glamour. These are definitley one of my favorites for a night out, or dramatic look. You can throw on your favorite pair of falsies or a few coats of your favorite mascara.


Once I think I'm done I like to take a step back, check my work, and make any changes necessary. I tend to add more shadow where needed, and blend in places that don't look blended enough! I hope you enjoy my complete eye look!


Please leave any questions or comments down below! Don't forget to follow my blog for Beauty Insider every day! 

My Makeup Wish List!

With so many new products on the market, you can bet my wish list is LONG! Here are a few products I can't wait to get my hands on! 

 
NYX Liquid Suede Lipsticks- I have heard many good things about these products, so I can't wait to try them out for myself, and review them for you. There are 12 beautiful shades to choose from, but I'm not sure which ones to try first! They retail for $7.00 online; you can also find them in store like ULTA and Target.


Younique Touch Mineral Liquid Foundation- If you have see the videos on Facebook or Youtube about this product, you will understand why I want this foundation! From what I have seen and heard, this product is literally magic in a bottle. Liquid formula, dries as a powder, and will literally cover anything I'm not sure it gets any better than that. I want to test it for myself to see if it's really worth the hype! You can find it on Younique's website for $39.00.

 Carly Bybel Eye shadow and Highlighter palette- This palette is so beautiful and can be used all the way into spring. Not only does it have 14 shadows, but it also had 4 highlighters. We all know, highlighters are a huge trend right now. (If you want a post all about strobing, highlighting, and my favorite products let me know in the comments) I've watched a ton of tutorials using this palette, every guru has their unique way of using this palette. I cant wait to show you my way of using it. I already have a few things in mind! You can find it on bhcosmetics.com for $12.50. That's a steal if you ask me! 


What's on your beauty wish list?? Let me know in the comments below. 

Don't forget to follow my blog for daily Beauty Insider.


Wednesday, November 18, 2015

My Five Fav!


Anastasia Beverly Hills Contour Kit
ABH Contour Kit has been one of my go to products for some time now. I use it just about every day, especially when I am doing a full glam look. I use the middle contour shade to chisel out my cheek bones, define my jaw line, and even contour my nose! As you can see from the picture, my kit has been through a lot but is still going strong. Not only do I use my kit for contouring, I have also used it as an eye shadow! It works perfect as a crease shade. The powders are silky which makes blending a breeze.


Urban Decay Naked 2 Basics
Naked 2 Basics is a cool tone eye shadow pallet. This mini palette is packed full of taupe shades- perfect for fall. I use this during the day for a light, bright shadow look, and I also use it at night for a bold look! The shadows are easy to blend- always a plus in my book! My favorite shadow to use for my crease is Frisk; I also love Skimp on the lid!


E.L.F. Blush 
For $3.00 these blushes are the BOMB! I prefer to use them together for a pinky, coral blush, but they're just as beautiful by themselves. Candid Coral and Pink Passion are my two favorite shades. I use these for every look I do on myself, and others. Depending on your skin tone, the shade of color will be different on everyone- another reason why I'm obsessed!


NYX Soft Matte Lip Cream
 Stockholm is the only shade I have right now, because I ran out of all my others! I love the formula of the soft matte lip creams. Silky, long lasting, and they won't dry out your lips! All of the shades are  pigmented- there's a ton of shades to choose from. I can't wait to get my hands on Transylvania and Copenhagen; perfect for a Vampy fall look!


E.L.F Cream Eyeliner
Again, for being only $3.00 this product is awesome! My eyelids tend to get oily at times and this liner stays put! The consistency is super creamy which makes it easy to apply. I like to apply it with a small angled brush for precision. A little goes a long way with this little guy!


Please feel free to leave any suggestions for future posts, questions or comments. Also, don't forget to follow my blog for more!