Showing posts with label makeup. Show all posts

Tuesday, December 1, 2015

Beauty Tip Tuesday: Lip Scrub

Today's beauty tip is all about lip scrubs!

Lip scrubs are important if you're a fan of matte liquid lipsticks like I am. Matte lipsticks tend to cake up on the dry skin of your lips because most of them aren't moisturizing. I have a solution for you- DIY 2 ingredient lip scrub.

For this scrub you're going to need 2 parts sugar to 1 part oil. I used Organic Coconut Sugar and Vitamin E oil, you can use what you have on hand. Coconut oil, olive oil, or grape seed oil work well. As for the sugar, pure cane sugar or brown sugar work great. You want the consistency of the scrub to be sorta like wet sand. 


Once you have your concoction all mixed up, you're ready to apply. I like to take a small amount, about the size of a pea and rub it in between my lips. I love doing this before I apply a matte lipstick because I don't have to worry about my lips drying out throughout the day. The oil in this scrub moisturizes my lips just enough so I won't have dry lips by the end of the night. As you can see from the before and after pictures, before the scrub my lips look dull and dry, but after the scrub my lips look flushed and have more of a pink/red tone than before. This happens because I am agitating my lips, this will also give a slightly more plump look, nothing drastic. When you're done rubbing the scrub on your lips, simply wipe it off with a damp paper towel. (or eat it, it is all natural after all LOL) I recommend doing this before you apply foundation so you don't disrupt your flawless foundation application.


Now you're ready to rock all the matte lipsticks your heart desires! I hope you enjoyed today's Beauty Tip Tuesday!
 

Monday, November 30, 2015

In-depth Baking Tutorial

For this tutorial you're going to need flour, eggs, butter... Just kidding! We're not doing that kind of baking today, this is a beauty blog after all. We're going to be baking our faces! That's right our faces. Earlier today I wrote a review for my Airspun Loose Face Powder and I promised a tutorial on how I use this product. Let's get right into the good stuff.

The stars of today show will be Airspun Loose Face Powder, Revlon Colorstay Concealer, Anastasia Beverly Hills Contour Palette, Real Techniques Contour Brush, large fluffy brush, makeup wedge, and a beauty bud (mine is by Younique).


I started this tutorial with a fresh application of my favorite foundation.


Next, I applied my Revlon Colorstay concealer in an upside down triangle under my eye. I like my concealer a few shades lighter that my skin tone to help highlight the centers of my face. You'll feel a little silly doing this but you'll get flawless results every time. With this concealer (and most) a little goes a long way. If you put too much, you'll have trouble blending it out later.


With my beauty bud, I blend out each eye until everything is seamless. It's best to dampen your beauty blender when blending out thick products; a damp beauty bud disperses the product evenly. Be sure to work out the product under your eye, you don't want it to cake up you pack on the setting powder.


Immediately after I blend out the concealer, I take my makeup wedge and pack on the Airspun powder. It looks like a lot, but this is where we get the term "baking". After you pack on the powder, leave it for five to ten minutes. This process will soak up all the oils under your eye that cause creasing. By leaving the powder to "bake" you are ensuring that your concealer will not budge or crease all day. With the edge of the beauty wedge I like to place some powder under my cheek bones to help contour my cheeks and also let that bake. While your baking, you can work on your eye shadow, etc.


After the timer goes off, in one swift motion wipe off all the excess powder with a large fluffy brush. Since the setting powder is translucent, it doesnt give me any color. I like to take my ABH Contour Kit, with my RT Contour Brush and apply the yellowish shade under my eyes just to give me some color!


Now, you're left with a flawless under eye that will last all day/night!  I hope you enjoyed today's tutorial on how to BAKE. Please follow my blog for daily Beauty Insider.

Sunday, November 22, 2015

Let's Talk: Moisturizers

I have searched far and wide to bring you the best moisturizers for YOUR unique skin type. Now, I don't want to burst your wallet or anything which is why I have picked the best under $20.  Beauty does come with a price, but it doesn't have to be an arm and a leg.

Taking care of your skin is important. It's also important to make sure you're using the right products for your skin, if you don't know your skin type, I just might be able to help. 
Oily Skin

Oily Skin
  • shiny
  • enlarged pores around the cheeks, nose, and forehead
  • more blackheads and blemishes than normal
 Dry Skin 
  • scaly or flaky
  • feels tight after cleansing and dry to the touch 
  • dry hands and feet could be an indicator 
Aging or Sun Damaged
Sensitive Skin
  • fine lines and wrinkles 
  • skin can appear loose due to loss of elasticity 
Sensitive Skin 
  • delicate with fine pores
  • may have broken capillaries around nose and on cheeks
Combination Skin 
  • most common skin type
  • medium pores
  • oily T-zone
  • Normal/Combo Skin
  • blackheads around the nose
Normal Skin 
  • even skin tone and texture 
  • healthy glow
  • small pores
 Okay, now to the good stuff! 

For my gals that have oily skin
  1. Clean & Clear Acne Control Moisturizer
  2. Cetaphil  Oil Control Moisturizer 
  3. Burt's Bees  Natural Acne Solutions Lotion
Dry Skin
Ladies with dry skin
  1. Neutrogena Hydro Boost Gel-Cream for Extra-Dry Skin
  2. Burt’s Bees Intense Hydration Day Lotion
  3. Coconut oil 
Sun kissed beauties with aging or sun damaged skin
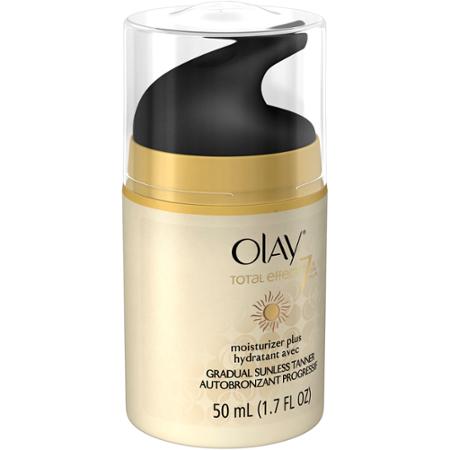
  1. Olay Total Effects 7 In One Moisturizer With a Touch Of Sun 
  2. Neutrogena Healthy Skin Anti-Wrinkle Cream 
  3. Eucerin Sensitive Skin Q10 Anti-Wrinkle Sensitive Skin Lotion SPF 15 
Sensitive girls
  1. Neutrogena Oil Free Moisture for sensitive skin
  2. Yes to Cucumbers Soothing Daily Calming Moisturizer
  3. Aging Skin
  4. Eucerin Redness Relief Soothing Night Cream 
Normal/Combo skin 
  1.  Yes To Carrots Daily Facial Moisturizer
  2. Cetaphil Moisturizing Cream   
  3. St Ives Timeless Skin Collagen Elastin Facial Moisturizer

Saturday, November 21, 2015

3 Step Morning Skin Care Routine!


Starting my day off refreshed with my 3 step morning routine! 


First, I like to take a hot rag and drape it on my face for about 15 seconds. This helps open up my pores so I can deep clean my skin! Then, I take my silicone scrubber (I raved about this product on a previous post!) and I put 2-3 pumps of my Cetaphil daily cleanser. This stuff is great because it doesn't dry out my skin, especially in the winter! Using my scrubber, I like to gently scrub my face in circular motions until a nice bubbly layer covers my face. Then, with my hands I like to wash off the cleanser with warm water. 


Next comes my beloved astringent! Sea Breeze is made to remove trapped oil, dirt, and makeup before they cause problems to the skin. I've been using this product for many years now, I love the clean feeling it give me. To use this product, I like to soak a cotton ball in the Sea Breeze and smooth over my face. Sea Breeze gives a cooling feeling on the face, (that's how you know its working) perfect for waking up in the morning! This product is great for deep cleaning your pores as well. You can find this product at your local drug store, Walmart, or Target. 

  
Lastly, I finish with Bare Minerals Purely Nourishing Moisturizer for dry skin. The astringent can be drying which is why I like to follow up with a thick and nourishing moisturizer. This moisturizer quickly absorbs into the skin giving you a silky smooth finish to your morning routine! You can find this product at Ulta, or your local Bare Minerals store!


Friday, November 20, 2015

Tweezerman Tweezers Review

While out fixing my cracked screen at the mall, I couldn't help but notice Sephora in perfect walking distance from the kiosk. So, I drug my boyfriend to Sephora, and after a good fifteen minute stroll in Sepora I finally picked up a new pair of Tweezerman tweezers! The tweezers I got were awarded by Allure Magazine, so I knew they had to be good! 

I knew once I got home I had to review this bad boy. (I like to pluck my brows in between eyebrow threading sessions- it's been a while if you can't tell!) I've always been a fan of Tweezerman, and once I lost my other pair of tweezers I was devastated, so I could only hope these lived up to my standards. 

Let me tell ya, they did! I was able to get every stray hair, even those short, to get hairs! If you're a plucker like me, Tweezerman is they way to go. They are sharp with a nice slant that makes it easy to grasp the hairs. Check out my before and afters! 


Let me know in the comments if you've ever used Tweezerman tweezers! Follow my blog for more Beauty Insider! 

5 Ways to Exfoliate

Want clean, glowing, refreshed skin? EXFOLIATE! Exfoliating gives you a smooth canvas for lotions and potions to effortlessly absorb into your face or body. After exfoliating, you're left with smooth, plump skin. Here are my favorite ways to exfoliate! 


Facial Exfoliation 

1. Silicone Facial Brush 
You can find these at Walmart in the Beauty section, or on Amazon. I use my scrubber every day. I love it for mild exfoliation. Not only does it remove the dead skin cells, it also helps to remove all the makeup built up in your pores.


2. St Ives Blemish Control Scrub 
If you have acne prone skin, this is a great option for you! Salicylic acid is a key ingredient in this scrub. It's also a key ingredient in many acne fighting remedies. With this scrub, a little goes a long way, I use a quarter size amount for my whole face. Rub the scrub in circular motions, going in an upwards direction, this way you're fighting gravity and won't cause premature aging! 


3.  DIY Coconut Oil Exfoliating Scrub
For this scrub you will need coconut oil and pure cane sugar. Its super simple to make, I have talked about my love for this scrub in my Beauty Tip Tuesday post. Organic unrefined coconut oil is best to use for this scrub. If you are making this scrub for facial use: in a small container, mix one tablespoon of coconut oil and two teaspoons of pure can sugar. Apply gently in circular motions, in a upward direction. I promise you, your skin will feel better than ever before. 


Body Exfoliation 
  
4. Exfoliation Loofah Pads
Not only is the DIY Coconut Oil Scrub good for your face, its also great for your body! (Put a few drops of your favorite essential oil, I like lavender oil.) I like to use my DIY scrub with a loofah pad for ultimate exfoliation.  Be sure to change out your loofah every two weeks to avoid unwanted bacteria. 


5. Shaving 
Believe it or not, shaving is a great way to exfoliate your legs and arms. When you shave not only are you removing body hair, you're also taking a layer of dead skin off. That's why your legs are touch-ably soft when you are done shaving! 


Tips:
  • Be sure to always use a moisturizer after any type of exfoliation treatment to prevent dry skin. 
  • Don't over do it. Exfoliating is great, but there is such thing as too much. Once or twice a week is enough to give you clean, soft skin.


All questions are comments are appreciated! Follow my blog for Beauty Insider every day!

Thursday, November 19, 2015

Plum Eye Look

Purples and plum eye shadows are perfect for brown eyes! I have broken down my favorite eye look into easy to follow steps. For this look I used the Fifth Edition 120 Color Eye Shadow Palette by BH Cosmetics, but this look can be used with any plum shades you like, or change out the colors to fit your look for the day.

First, I started off with a clean eye and applied a base. For my base I am using Master Conceal by Maybelline in the shade 10 Fair. I like to use this as a base because it helps my eye shadow stay all day. After I applied the concealer, I set it with a skin tone powder.


Next, I applied a tan eye shadow from my Fifth Edition Palette. I used a large fluffy blending brush for this step. The key is to blend until you have flawless transition and no harsh lines. It won't look like much now, but adding a transiton shade to the top of the crease bone will make blending all other shadows so much easier.


I applied a second brick tone shade into my crease. I used a smaller blending brush for more precision. Again, blend until you can blend any more! By adding a brick tone, red-brown shade I am creading dimension in the crease. 


After my transition shades were blended together, I took the darkest plum shade on my palette and applied it to the outer corner until I covered about 1/3 of my eye. Be sure to pack this color on using a patting motion to get the most pigmentation and color pay off. With the same brush (shader brush) I also applied a small amount of black to deepen the look. By the end of the tutorial, you will see that I have added more dark plum and black to make the color POP!


Next comes the middle and inner corner, for this step I used a different shader brush. I applied a lighter plum color and a cranberry color to the middle lid. For the outer corner I applied a metallic plum shade. I made sure to pack these colors on as well.  


Next comes the winged liner. This step is optional! If you're not comfortable with a wing, you can simply have a thin line of eyeliner, or you can skip this step all together! I used my favorite cream eyeliner by E.L.F. with a small angled brush. Since this liner is smudge proof you can even apply it to your water line with your angled brush for an even more dramatic look.


Another optional step, but one of my favorites, FALSIES! I am wearing falsies by Vegas Nay in the style Grand Glamour. These are definitley one of my favorites for a night out, or dramatic look. You can throw on your favorite pair of falsies or a few coats of your favorite mascara.


Once I think I'm done I like to take a step back, check my work, and make any changes necessary. I tend to add more shadow where needed, and blend in places that don't look blended enough! I hope you enjoy my complete eye look!


Please leave any questions or comments down below! Don't forget to follow my blog for Beauty Insider every day! 

Wednesday, November 18, 2015

My Five Fav!


Anastasia Beverly Hills Contour Kit
ABH Contour Kit has been one of my go to products for some time now. I use it just about every day, especially when I am doing a full glam look. I use the middle contour shade to chisel out my cheek bones, define my jaw line, and even contour my nose! As you can see from the picture, my kit has been through a lot but is still going strong. Not only do I use my kit for contouring, I have also used it as an eye shadow! It works perfect as a crease shade. The powders are silky which makes blending a breeze.


Urban Decay Naked 2 Basics
Naked 2 Basics is a cool tone eye shadow pallet. This mini palette is packed full of taupe shades- perfect for fall. I use this during the day for a light, bright shadow look, and I also use it at night for a bold look! The shadows are easy to blend- always a plus in my book! My favorite shadow to use for my crease is Frisk; I also love Skimp on the lid!


E.L.F. Blush 
For $3.00 these blushes are the BOMB! I prefer to use them together for a pinky, coral blush, but they're just as beautiful by themselves. Candid Coral and Pink Passion are my two favorite shades. I use these for every look I do on myself, and others. Depending on your skin tone, the shade of color will be different on everyone- another reason why I'm obsessed!


NYX Soft Matte Lip Cream
 Stockholm is the only shade I have right now, because I ran out of all my others! I love the formula of the soft matte lip creams. Silky, long lasting, and they won't dry out your lips! All of the shades are  pigmented- there's a ton of shades to choose from. I can't wait to get my hands on Transylvania and Copenhagen; perfect for a Vampy fall look!


E.L.F Cream Eyeliner
Again, for being only $3.00 this product is awesome! My eyelids tend to get oily at times and this liner stays put! The consistency is super creamy which makes it easy to apply. I like to apply it with a small angled brush for precision. A little goes a long way with this little guy!


Please feel free to leave any suggestions for future posts, questions or comments. Also, don't forget to follow my blog for more!